Soil Permeability and Leaching Systems
Contents
[hide]Percolation Testing
The percolation test is a simple method of confirming soil permeability. It is used extensively for planning and designing on-site leaching systems for managing wastewater effluent. To run a percolation test, you will need the following materials:
- Trowel or small shovel
- Water
- Ruler or tape measure
- Pencil or pen
- Paper
- Watch or clock
Follow these instructions to begin testing:
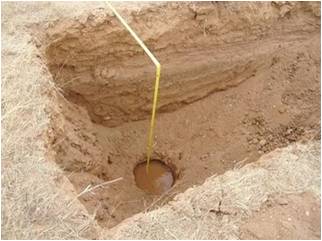
- Dig a round hole in the soil at the depth you want to test. The hole should be 30 cm in diameter and 24 cm deep.
- Fill the hole with water, and keep it full for 4 hours. Water will tend to seep away, so have plenty of water nearby to keep the hole full.
- After the 4 hour period, let the hole sit for 16 to 30 hours. This will allow any clay particles to swell and better resemble conditions that will occur in a leaching trench or pit. These three steps accomplish the pre-soaking.
- After the hole has sat for 16 to 30 hours, clean out any debris or smeared soils from the hole with a trowel or small shovel. Now it is time to run the test.
- With the ruler or tape measure in the hole, fill the hole with water to a depth of 12 cm as measured from the bottom of the hole. Note the time. Observe the ruler, and record the time when the water level drops 2 cm. Then fill the water back to the 12 cm level and repeat the test. Repeat the process until you get three consecutive readings all within 10% of each other.
Interpreting the Results
The steps above will give you a percolation rate that will help you design a leach trench for receiving waste from the septic tank. If the rate it takes for the water to drop 2 cm is between 5 and 120 minutes, the soils are suitable for leach trenches. If the rate is faster than 5 minutes, the risk is too great that wastewater (and pathogens) will make it to the groundwater. If the percolation rate is too slow, the wastewater could pond and cause a health hazard.
Use the following general guidance to determine the soil's capacity to hold wastewater - called the application rate - based on percolation:
- 5 minutes to drop 2 cm: you can apply 40 liters of wastewater effluent per day per square meter
- 30 minutes to drop 2 cm: you can apply 20 liters per day per square meter
- 60 - 120 minutes to drop 2 cm: you can apply 8 liters per day per square meter
Designing Leach Trenches
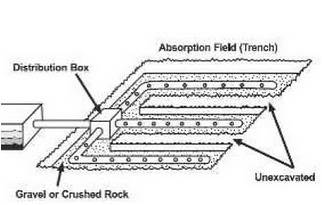
Leach trenches are shallow gravel-filled excavations in the form of trenches or beds. They are used to receive septic tank effluent and apply that effluent to the soil where it may be absorbed. The key to sizing leach trenches is knowing how much effluent you have per day (flow), and how much effluent you can apply to each square meter of soil (application rate).
Find the number of square meters your leach trench requires (effective area) by dividing the flow by the application rate.
Example:
Effective area: how many square meters of trench sidewall are required
Flow: 1,000 liters of effluent per day
Application rate: 20 liters of effluent per square meter per day
Effective area = 1,000 liters per day/20 liters per sq. meter per day = 50 sq. meters.
Once you know how many square meters are required, you can lay out your leach trenches. Leach trenches are sized based on sidewall area. Remember that there are two sidewalls for each trench. So if your trench is 25 meters long and 1 meter deep, there are 50 square meters of effective area. Or if you can excavate a trench 2 meters deep, it only has to be 12.5 meters long to provide your 50 square meters required.
Use this formula to determine the length required:
length of trench = effective area/depth/2
Some Final Notes on Leach Trenches
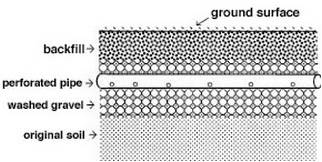
In the drawing to the left, notice that the perforated leaching pipe (typically PVC or plastic with holes evenly spaced) is not at the ground surface. The effective depth of the trench is actually calculated as the depth below the pipe to the bottom of the excavation. The depth does not include the backfill above the pipe.
When constructing leach trenches, make sure to keep the bottom level and remember that the outlet of the septic tank must be higher than the inlet of the trench or distribution box. The difference in height is called fall, and typically 10 cm fall is enough.
Additional Resources
El Dorado County, California's Department of Environmental Health’s website features practical tips on installing septic tanks and leaching systems. Visit them online at edcgov.us/Liquid_Waste_Program.
Coconino County, Arizona’s web site offers information on site assessments as well as forms for septic and alternative system permits that can be used as templates. Visit their site at coconino.az.gov.


