Budidaya Kelapa Sawit Berkelanjutan / Menandai sawit dan sampling pelepah
Unduh: Modul 4: Aplikasi Pupuk
Contents
Latar belakang
Untuk memastikan keberlangsungan manajemen dan hasil panen yang stabil, maka perlu dibuatkan pemetaan perkebunan yang menunjukkan sawit mana saja yang terindikasi. Pada pemetaan ini, sawit dura dan pisifera dan lahan kosong juga perlu ditandai. Dengan ini, penting pula untuk memilih dan menandai 'sampel sawit’ untuk pengawasan hama dan koleksi sampel pelepah, karena akan sangat menguras kinerja jika harus memeriksa atau mengambil sampel dari semua sawit yang ada. Memang butuh waktu untuk melakukan pemetaan dan menandai sampel sawit, namun pada akhirnya hal ini akan menghemat waktu kerja – meskipun proses sampling pelepah belum pernah dikerjakan.
Tujuan
- Agar dapat memantau efisiensi manajemen dan produktivitas;
- Agar dapat secara efektif menjalankan proses patroli hama;
- Agar dapat secara efisien menjalankan proses sampling pelepah.
Standarisasi
- Menyediakan pemetaan perkebunan secara lengkap, yang menunjukkan posisi sawit, lahan kosong, dan batas-batas perkebunan;
- Pemilihan sampel sawit antara 1-4 persen dari seluruh populasi sawit di perkebunan;
- Sampel sawit sehat dan merupakan representasi dari perkebunan;
- Sampel sawit tersebar secara merata di seluruh areal perkebunan;
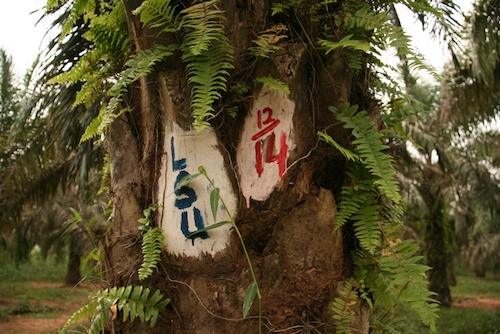
- Sampel sawit ditandai dengan jelas.
Waktu pelaksanaan
- Sekali, pada awal proses rehabilitasi.
Frekuensi
- Sekali sepanjang waktu efektif perkebunan.
Catatan: Setiap kali melakukan proses sampling (atau jika dilakuan sekali dalam setiap tahun) periksa kembali sampel sawitnya apakah masih dalam kondisi sehat dan penandanya masih jelas. Jika tidak, pilih sawit lainnya dan/atau ulang kembali penanda sawitnya.
Kebutuhan waktu tenaga kerja
- Menggambar peta perkebunan: 2-3 jam untuk lahan seluas 2 hektar.
- Menandai sampel sawit: 1-2 jam per 2 hektar.
Peralatan dan perlengkapan
- Kuas cat;
- Cat biru dan kuning;
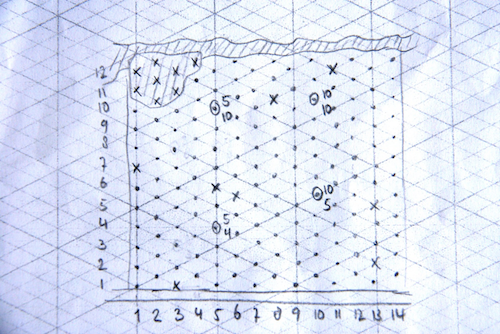
- Kertas isometrik atau lainnya (lihat Gambar 27);
- Opsional: meteran, GPS.
Tenaga kerja
- Para petani dan keluarganya atau karyawan harian lepas.
- Sebaiknya dikerjakan bersama dengan penyuluh atau perwakilan dari kemitraan.
Cara pelaksanaan
Menggambar peta perkebunan
Peta perkebunan biasanya digambar pada kertas isometrik (lihat Gambar 27). Setiap sawit harus digambarkan sebagai titik pada simpangan dua garis (lihat Gambar 28). Jika tidak ada penanaman sawit di lokasi itu, beri silang atau kosongi saja.
Catatan: Jika lahan tidak berbentuk persegi panjang, penggambarannya akan lebih sulit. Kertas isometrik hanya bisa digunakan ketika sawit ditanam di ruang (segitiga) yang tepat. Untuk ruang persegi (bujursangkar), gunakan kertas matematis sederhana yang menggunakan rentetan bujursangkar. Untuk bentuk ruang lainnya, gambar peta perkebunan pada kertas kosong tanpa garis.
Untuk menggambar peta perkebunan, gunakan langkah-langkah berikut:
| Langkah 1. | Select the first field to be mapped. |
| Langkah 2. | Determine the boundaries of the field (e.g. roads, other crops, rivers/streams, oil palm from someone else etc.). |
| Langkah 3. | Determine the direction of the palm rows:
If the field is not rectangular, try to find the direction of the rows which makes them most easy to count. |
| Langkah 4. | Draw the palms next to the main road into the map and count the number of rows. |
| Langkah 5. | For each row, draw in the palms and count the number of palms per row. |
| Langkah 6. | Indicate streams, rivers, roads and other borders, trying to keep the size correct. Note: Usually a road is one palm row wide (sometimes two). |
Selecting and marking sample palms
To select and mark sample palms follow these steps:
| Step 1. | Select which road will be the main road. |
| Step 2. | Starting in one corner and moving along the road count five rows. At the 5th row:
Note: all palm numbers at the roadside should be ‘1’. |
| Step 3. | Find the direction of the row and follow the row from palm to palm until you get to palm 5. Note: Empty spots also count. |
| Step 4. | At palm 5, check the following:
|
| Step 5. | If the answer to one of the questions is ‘no’, move two palms further into the row and check again. |
| Step 6. | If the answer to all the questions is ‘yes’, mark that palm as described above (in this case: ‘5 over 5’) (see Figure 29). |
| Step 7. | Continue along the row, each time marking the 5th palm (or two palms farther along if the 5th palm doesn’t meet the conditions) until you are two palms from the other end of the field. The palms that are close to the edge of the field (one or two palms away) should not be sampled, because they are not representative (for example, they get more sunlight). |
| Step 8. | Move on to the field boundary |
| Step 9. | Move five rows further along the boundary at the other end. After 5 rows, mark the palm next to the boundary. This should be the 10th row after the start of the field, so the row number on this palm should be 10. The palm number is the number of the last palm in the row.
Note: If the field is not rectangular, it may be necessary to walk back to the beginning of the row and count the number of palms to determine the palm number. |
| Step 10. | Move into the field and repeat step 8–13. |
| Step 11. | Continue until the entire field is done. |
Note: The number of the palms to mark depends on the size of the field. In large fields (5–10 ha) it is better to take every 8th row and every 8th palm. In even larger fields (more than 10 ha) you can take every 10th row and every 10th palms. This is also what companies do.
If the field is not at all rectangular, try to select the palms as follows:
- One palm in 25 (or in 64 or 100 in larger plantations);
- Not the palms less than 2 lines from the boundary;
- At least 4 non-sample palms between the sample palms in each direction.
Acknowledgements
The material from Palm marking and leaf sampling is sourced from Smallholder Oil Palm Handbook and put together by Lotte Suzanne Woittiez (Wageningen Universit) and Haryono Sadikin, Sri Turhina, Hidayat Dani, Tri Purba Dukan, and Hans Smit (SNV) in August 2016. See Module 4: Fertiliser Application for more information.


