KARI

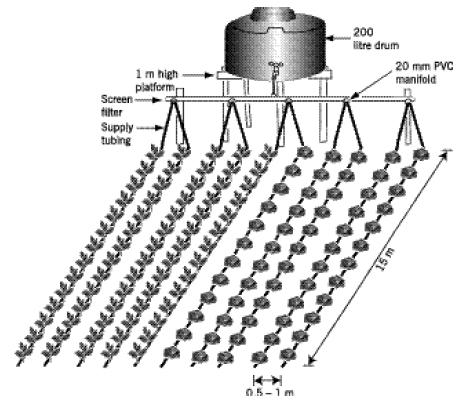
This is a variation of the Chapin bucket kit and involves using a drum of about 200-litre capacity or the equivalent of five bucket drip irrigation systems. The development of this adaptation is credited to a farmer in Eldoret in the Rift Valley Province of Kenya who, after working with the bucket drip kits, connected an old drum to supply four drip lines. KARI improved on the drum adaptation by designing the manifold with 4 or 5 openings each serving two drip lines.
Uses of a drum system
A drum system covering 5 beds each 1 m wide and 15 m long can be used to grow 250 plants (tomato, egg plant and similar plants requiring a spacing of 60 cm along the plant rows); 500 plants (spinach, cabbage, kale, pepper and similar plants requiring a spacing of 30 cm along the plant rows); or 1,500 plants (onion, carrot and similar plants requiring a spacing of 10 cm). The drum system also offers water storage and control through a control valve, making it possible to fill the drum for irrigating at another time.
Six examples are presented: the KARI drum system from Kenya, the Waggon Wheel system from South Africa, the Family, Plastro and Micro-Tal systems from Israel, and the IDE drum used in India.
Construction, operations and maintenance
The standard drum kit system comprises a drum, control valve, a manifold and drip lines. The drum should be filled with the valve in the closed position. To irrigate it is important to open the valve fully. This allows the water to be distributed quickly through the drip lines and allows for good water distribution.
System components
- 200-litre drum with opening at one end or cut open ∫” gate valve (control valve) ∫” x 6 m plastic water pipe
- 4 x ∫” PVC tees
- 3 x ∫” PVC bends
- 5 filter plugs
- 10 x 0.5 m lengths of flexible tubing
- 10 barb x drip lock fittings
- 10 x 15 m drip irrigation tubes
- 10 drip tube end closures.
Assembly instructions
- Prepare a rectangular area 7.5 wide x 16 m.
- Peg out the position of beds and paths to accommodate 5 beds each 1-m wide x 15-m long. Leave a 20 cm space between the beds.
- Connect the manifold by cutting the pipe into 3 pieces each 1.25 m long. These are connected to the 3 tees and the 2 bends connected at the ends. The 3 tees and 2 bends on each side of the PVC pipe are designed to be centrally located on the five planting beds. Depending on the location of the drum, a tee is connected to channel the water from the drum to the manifold.
- Use PVC glue for leak-proof fitting and wait for the required duration to allow bonding.
- Lay out the drip tapes on the beds, two lines per bed, and insert the filter plugs into the open ends of the outlets in the manifold.
- Finally, connect one end of the connector tubing to the filter plug and insert the barb fitting to the other end. Connect the drip tube to the drip lock fitting.
Costs
To install a drum system costs about KSh7,500 (US$100) in Kenya.
Acknowledgements
- Sijali, Isaya V. DRIP IRRIGATION: Options for smallholder farmers in eastern and southern Africa. RELMA, 2001.